Whether you're upgrading your home safety or tackling a DIY project, understanding how to install a Ground Fault Circuit Interrupter (GFCI) outlet is invaluable. GFCI outlets are designed to prevent electrical shock by immediately cutting off power upon detecting a fault. This comprehensive guide will walk you through the importance, steps, and nuances of installing GFCI outlets, ensuring a perfect balance between safety and functionality.
Understanding GFCI Outlets
What is a GFCI Outlet?
A Ground Fault Circuit Interrupter (GFCI) outlet is a modern electrical outlet with built-in protection. It continuously monitors electricity flowing through a circuit, and if it detects any imbalance, it quickly cuts off the power, thus preventing electrical shocks. GFCI outlets are crucial, especially in moisture-prone areas like kitchens, bathrooms, and outdoor spaces.
Why Install GFCI Outlets?
- Enhanced Safety: Protects against critical electrical shocks.
- Code Compliance: Required by electrical codes in specific areas of the home.
- Property Value: Increases safety standards, potentially boosting property value.
Preparing for Installation
Tools You Will Need
Before starting, gather these essential tools:
- Voltage tester
- Screwdriver set
- Wire strippers
- Needle-nose pliers
- Electrical tape
Safety First
Safety cannot be overemphasized. Make sure to:
- Turn Off Power: Switch off the circuit breaker controlling the outlet you intend to replace.
- Verify Power is Off: Use a voltage tester to ensure there's no current.
Step-by-Step Installation
Remove the Existing Outlet
Start by carefully removing the existing outlet:
- Unscrew the Outlet Cover: Use a screwdriver to remove the screws and the outlet cover plate.
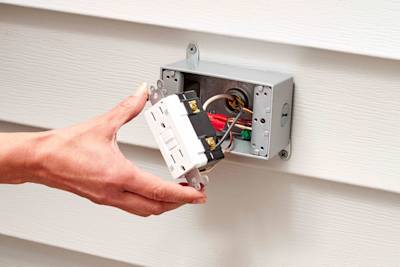
- Detach the Outlet: Unscrew the outlet from the electrical box. Gently pull it out while still connected to the wires.
Identify Your Wires
Typically, you'll find three types of wires:
- Black (Hot): Carries the current.
- White (Neutral): Completes the circuit.
- Green or Bare (Ground): Safety measure to prevent electrical shock.
Connect the GFCI Outlet
Now, let's wire the new outlet:
- Connect the Ground Wire: Attach the green or bare wire to the green ground screw on the GFCI outlet.
- Attach the Neutral Wire: Connect the white wire to the silver 'LINE' terminal.
- Connect the Hot Wire: Attach the black wire to the brass 'LINE' terminal.
Secure the GFCI Outlet
Once wired:
- Tuck Wires Back: Carefully push back the wires into the outlet box.
- Attach the Outlet: Secure the GFCI outlet to the box using the provided screws.
- Replace the Outlet Cover: Screw on the faceplate, ensuring it's flat and stable against the wall.
Testing Your GFCI Outlet
Ensure Functionality
After installation:
- Restore Power: Switch the circuit breaker back on.
- Test the GFCI: Press the 'RESET' button on the outlet, followed by the 'TEST' button. The power should cut off, ensuring it's functioning correctly.
Troubleshooting Tips
- If the GFCI does not reset, recheck your wiring.
- Ensure the power is correctly flowing to the outlet.
Maintenance Tips
To maintain the effectiveness of your GFCI outlets:
- Regularly test each outlet to ensure reliability.
- Immediately replace damaged or malfunctioning GFCI outlets.
- Keep the outlets clean and dry to prevent accidental trips.
Common Mistakes to Avoid
- Incorrect Wiring: Double-check wiring diagrams to prevent errors.
- Ignoring Ground Connection: Ensure a proper and secure ground connection.
- Neglecting Testing Post-Installation: Always test to confirm functional safety features.

FAQ on GFCI Outlet Installation
Why should I install a GFCI outlet in my home?
Installing a GFCI (Ground Fault Circuit Interrupter) outlet in your home is crucial for safety. GFCI outlets are designed to protect people from electrical shock by monitoring the flow of electricity and tripping the circuit if they detect an imbalance or potential ground fault. This type of outlet is especially important in areas of the home where water is present, such as kitchens, bathrooms, and laundry rooms, since water increases the risk of electrical shock. By installing these outlets, you significantly reduce the risk of electrical accidents, contributing to a safer living environment.
How do I identify a GFCI outlet?
Identifying a GFCI outlet is simple. GFCI outlets typically have two buttons located between the slots, commonly labeled "Test" and "Reset." These buttons are often color-coded, with a black "Test" button and a red or yellow "Reset" button. If you press the "Test" button, it should cause the outlet to click and cut off power until you press the "Reset" button, which restores power. Unlike standard outlets, GFCI outlets frequently have a larger face or an indicator light that may be on when the outlet is operational. Look for these features when trying to identify whether an outlet is a GFCI.
Where are GFCI outlets required by code?
Building codes typically require GFCI outlets in areas where electrical circuits are likely to come into contact with water. This includes kitchens, bathrooms, garages, laundry rooms, basements, crawl spaces, and outdoor areas. The National Electrical Code (NEC) updates its requirements regularly, and while the specifics might vary based on local regulations, it generally mandates GFCI outlets in these high-risk zones. Checking with local building codes is always a good idea to ensure compliance when installing GFCI outlets, as local adaptations might differ.
Can I install a GFCI outlet myself?
Yes, you can install a GFCI outlet yourself if you're comfortable working with electricity and have a basic understanding of electrical systems. The process involves cutting power at the circuit breaker, removing the existing outlet, and connecting the new GFCI outlet in its place by attaching the wires to the terminal screws. It's crucial to follow all safety protocols and instructions specific to the GFCI model you're installing. However, if you're uncertain or feel uneasy about handling electrical work, it's always best to hire a qualified electrician to ensure proper and safe installation.
How long does it take to install a GFCI outlet?
The time it takes to install a GFCI outlet can vary depending on your level of experience and the condition of the existing electrical setup. For someone with electrical experience, installing a GFCI outlet can take as little as 10 to 20 minutes. However, if you're not experienced, it might take longer due to the need to carefully follow instructions and ensure correct connections. Factors such as accessibility and any complications with the existing wiring can also affect installation time. If the wiring is outdated or incompatible, it might require additional adjustments, potentially extending the installation process.
Are GFCI outlets more expensive than standard outlets?
Yes, GFCI outlets are generally more expensive than standard outlets due to the additional safety features they provide. While the upfront cost of GFCI outlets can be higher, they offer significant benefits like the prevention of electrical shocks and fire hazards, which can save costs in the long run by avoiding potential accidents and damages. The price difference reflects the technology inside the GFCI that allows it to detect ground faults and immediately shut off power to prevent injury. Despite the initial investment, the safety benefits make GFCI outlets a valuable addition to any home.
How often should I test my GFCI outlets?
It's recommended to test your GFCI outlets every month to ensure they are functioning correctly. Testing involves pressing the "Test" button on the GFCI outlet, which should immediately shut off power to the outlet. After testing, the "Reset" button should be pressed to restore power. Regular testing helps guarantee that the GFCI outlet is capable of detecting ground faults and interrupting the circuit as designed. Testing frequency can depend on factors such as the outlet's location and the local environment, but monthly checks offer an excellent way to maintain electrical safety.
Can a GFCI outlet go bad?
Yes, like any other electrical component, a GFCI outlet can wear out or malfunction over time. Common signs of a faulty GFCI include outlets that won't reset, frequent tripping without apparent cause, or power not being sustained after resetting. Environmental factors such as moisture and dust accumulation can contribute to a GFCI outlet going bad. Regular testing and maintenance are vital to ensure they are functioning correctly. If your GFCI outlet consistently trips or does not respond to being reset, it's advisable to replace it to maintain safety in your home.
Do GFCI outlets need a special type of circuit breaker?
GFCI outlets do not require a special type of circuit breaker to function properly. They are designed to replace standard outlets on regular circuits and will work with your current electrical setup. However, it’s important that they are installed correctly, with attention to proper wiring, to ensure they will provide effective ground fault protection. If multiple GFCI lines are necessary for your home wiring, ensure they are appropriately configured to maintain effective fault detection and circuit interruption capabilities. If you're unsure about your home's electrical wiring configuration, consulting a professional may be beneficial.
What's the difference between a GFCI outlet and an AFCI outlet?
GFCI (Ground Fault Circuit Interrupter) and AFCI (Arc Fault Circuit Interrupter) outlets serve different safety functions. GFCI outlets are designed to protect against electrical shock by detecting ground faults, which occur when electrical current escapes its intended circuit. In contrast, AFCI outlets are designed to detect arc faults, which are unintended electrical discharges that can cause electrical fires. While GFCI outlets are primarily used in water-prone areas, AFCI outlets are typically installed in bedrooms, living areas, and other parts of the dwelling to protect against fire hazards. Both provide vital protection tailored to different types of risks in the home.

Step-by-Step Guide
Tools/Materials Needed
- GFCI outlet
- Screwdriver (flathead and Phillips)
- Wire stripper/cutter
- Voltage tester
- Electrical tape
- Needle-nose pliers
- Wire connectors (wire nuts)
- Faceplate for the GFCI outlet
- Safety gloves and glasses
Preparation Steps
Safety First: Before starting, make sure you have turned off the power to the outlet at the main breaker box. Double-check by using a voltage tester on the outlet to ensure there is no electricity flowing.
Gather Your Tools and Materials: Have everything you need within reach. This will make your installation process smoother, saving you trips back and forth.
Read the Instructions: This might sound basic, but always review the instructions included with your GFCI outlet. Manufacturers may have specific recommendations.
Detailed Instructions
Remove the Existing Outlet:
- Use your screwdriver to remove the faceplate of the existing outlet.
- Unscrew the outlet from its electrical box and gently pull it out, exposing the wires.
Identify and Label the Wires:
- You’ll generally see a set of black (hot) and white (neutral) wires connected to screws, and a green or bare copper wire for ground.
- Use your voltage tester to ensure the power is indeed off.
- Label the line and load wires using masking tape. The “line” wires are the ones that provide power from the breaker box. The “load” terminals are used if you want to protect additional outlets downstream.
Disconnect the Wires:
- Carefully disconnect the wires from the existing outlet, starting by loosening the screws.
- Straighten the wire ends with needle-nose pliers if needed.
Prepare the New GFCI Outlet:
- Note that GFCI outlets have two sets of terminals marked “LINE” and “LOAD.” The line terminals are for the incoming power.
Connect the Wires:
- Start with the line terminals: Connect the black wire to the brass screw and the white wire to the silver screw, tightening securely.
- Connect the green or bare copper ground wire to the green screw on the outlet.
- If you have additional outlets downstream you want to protect, connect those wires to the LOAD terminals, matching the color with the same color screw as before.
Secure the Outlet into the Box:
- Carefully fold the wires into the electrical box and screw the GFCI outlet in place.
Install the Faceplate:
- Attach the new faceplate and secure it with a screw, ensuring no wires are pinched beneath it.
Turn the Power Back On:
- Return to your breaker box and turn the power back on.
- Test the outlet using its built-in “TEST” and “RESET” buttons to ensure it’s working. The TEST button should turn the outlet off, and the RESET should restore power.
Tips for Success
- Double-Check Connections: Always ensure each wire is connected to the correct terminal and is tightly secured.
- Take Your Time: Rushing can lead to mistakes. Carefully review each step as you proceed.
- Label Wires Clearly: Mislabeling wires can cause issues, so make sure they are correctly marked.
- Test Before Use: Confirm your installation is successful by testing the outlet and downstream devices.
What to Do If Something Goes Wrong
- Outlet Doesn't Work: If the outlet doesn’t deliver power, double-check your connections and retest with the voltage tester. Make sure the outlet is not tripped and is installed properly.
- Frequent Tripping: If the GFCI keeps tripping, it might be detecting a genuine ground fault. Check appliances connected to this outlet for faults or moisture.
- Call a Professional: If you're unsure at any step or something doesn't seem right even after rechecking, it’s best to call in a professional electrician. Safety is the priority.

Common Mistakes to Avoid
Incorrect Wiring Connections
One common mistake when installing GFCI outlets is incorrect wiring connections. This can happen if you’re unfamiliar with electrical wiring or if you rush through the installation process. Incorrect wiring, such as reversing the line and load connections, can lead to malfunctioning of the GFCI, compromising safety.
To avoid this, carefully follow the instructions provided with the GFCI outlet. Take the time to identify the line and load wires properly. If possible, label the wires before disconnecting the old outlet. When in doubt, consult a professional electrician.
If you've already made the mistake, turn off the power to the outlet from the circuit breaker, detach the wires, and then recheck the connections. Ensure that the line wires are connected to the line terminals and the load wires to the load terminals.
Expert Recommendation: Always use a voltage tester before handling wires to ensure no power is flowing through them. Safety comes first!
Skipping Usage of a Ground Wire
Another mistake is neglecting to use the ground wire during installation. This often occurs because older homes might have two-wire non-grounded systems, leading to confusion about the necessity of a ground wire.
To avoid this, always ensure that you use the ground wire when it is present. If your outlet box doesn't have a ground wire, you can still install the GFCI outlet for shock protection, but be informed that this setup won't protect electronics from power surges.
If you've installed a GFCI outlet without a ground wire in an area that requires it, consider using a GFCI-protected circuit breaker or having a professional evaluate your electrical system for potential updates.
Expert Recommendation: Always label these outlets with a “No Equipment Ground” sticker to avoid future confusion.
Ignoring Local Electrical Codes
Overlooking local electrical codes is another prevalent mistake. These codes are in place for safety and can vary greatly from one region to another. Ignorance or misunderstanding of these codes might lead to improper and potentially unsafe installations.
Stay informed by reviewing your local building codes before starting the installation. Some jurisdictions might require a permit for electrical work, so make sure you’re compliant.
If you find you’ve already ignored local codes, it’s best to consult with a licensed electrician to inspect and verify your work or to make necessary changes.
Expert Recommendation: Engage with local inspectors or electricians early when planning electrical projects to ensure compliance.
Neglecting Functionality Testing
After installing a GFCI outlet, some people forget to test if it’s functioning correctly. This oversight can happen simply due to enthusiasm about completing the project or a lack of knowledge about the need for testing.
Always test your GFCI outlet right after installation by pressing the "Test" button to see if it trips, and then the "Reset" button to restore it. This confirms it’s protecting the area as intended.
If you skipped this step, go back and conduct the test. If the test fails, double-check all your connections, or consider seeking professional help.
Expert Recommendation: Make GFCI testing a regular part of your home maintenance plan to ensure ongoing protection.
Failing to Correctly Size the GFCI Outlet
Sometimes, people may inadvertently select a GFCI outlet of incorrect amperage for the circuit it’s supposed to protect. This mistake often results from not checking the circuit’s specifications or misinterpreting them.
Avoid mismatched sizing by confirming the circuit’s specifications, typically 15 or 20 amps, and using an outlet that matches that capacity. Circuit ratings are usually found on the breaker.
If you realize you’ve installed the wrong outlet, replace it with the correct one immediately to prevent overloading the circuit.
Expert Recommendation: Double-check your circuit’s breaker to ensure correct amperage rating before purchasing a GFCI outlet.
Overlooking the Load Connection
Another frequent error is failing to properly connect the load side of the GFCI outlet to downstream outlets expecting GFCI protection. This often results from a missed step in the instructions or misunderstanding the implications of the line and load distinction. Carefully read through the GFCI installation instructions to understand how the load terminals work. These allow additional outlets in the same circuit to be protected by the GFCI. If you’ve overlooked connecting the load side, and downstream protection was your intent, you’ll need to go back, identify the load terminals, and connect them properly. However, make sure that both the line and load sides are not overloaded.
Final Thoughts
Installing a GFCI outlet is an important step to ensure safety in areas prone to moisture, like kitchens and bathrooms. It's not just about following electrical codes; it's about protecting your loved ones from potential hazards. With proper placement and regular testing, these outlets can significantly reduce the risk of electrical shock.
If you're in Sacramento, CA, and you're considering GFCI outlet installation for your home, we’re here to help. Our team at Sagan Electric is dedicated to keeping your home safe and sound, and we’re ready to assist you with any questions or installation needs. Feel free to reach out to us to schedule a consultation or request a free estimate, and let’s make your home safer together.
Tags: safety, electrical, home maintenance,

